
Your cart is currently empty!
Introduction to Disk Analysis Using Autopsy
Summarize with:
Today, I’ll take you through Autopsy, a comprehensive digital forensics platform.
Autopsy is made for analyzing disk images, recovering deleted files, and uncovering user activities.
Installing Autopsy on Windows
Prerequisites
- Windows Operating System: Autopsy runs on Windows 7, 8.1, and 10.
- Java Development Kit (JDK): Ensure that you have the latest version of JDK installed. You can download it from Oracle’s official site.
Step-by-Step Installation
- Download Autopsy:
- Visit the official Autopsy website and download the latest Windows installer for Autopsy.
- Run the Installer:
- Locate the downloaded
.msifile and double-click it to start the installation process. - Follow the on-screen instructions to complete the installation. During the installation, ensure to select all the recommended plugins and modules.
- Locate the downloaded
- Verify Java Installation:
- After installing, open Command Prompt and type
java -versionto ensure that Java is correctly installed and recognized.
- After installing, open Command Prompt and type
- Launch Autopsy:
- Once the installation is complete, you can launch the tool from the Start menu.
- On the first launch, you may need to configure case settings and other user-specific options.
- Update Autopsy (Optional):
- Check for updates regularly to ensure you have the latest features and security patches. Autopsy can be updated via the ‘Check for Updates’ option within the application.
Installing Autopsy on Linux
Prerequisites
- Linux Distribution: Autopsy can be installed on various Linux distributions such as Ubuntu, Debian, Fedora, etc.
- Java Development Kit (JDK): Install JDK using your package manager or download it from the Oracle website.
Step-by-Step Installation
- Install Dependencies:
- Open a terminal and install the necessary dependencies using your package manager. For Ubuntu/Debian systems, you can use:
sudo apt-get install sleuthkit testdisk
- Open a terminal and install the necessary dependencies using your package manager. For Ubuntu/Debian systems, you can use:
- Download Autopsy:
- You can download the latest version of Autopsy from the official GitHub repository. You can clone the repository using:
git clone https://github.com/sleuthkit/autopsy.git
- You can download the latest version of Autopsy from the official GitHub repository. You can clone the repository using:
- Build the tool:
- Navigate to the cloned directory and build Autopsy using:
cd autopsy sh unix_setup.sh - This script will download and configure all necessary components.
- Navigate to the cloned directory and build Autopsy using:
- Run the tool:
- After building, you can start Autopsy using:
bin/autopsy - The first time you run the tool, you will need to set up case directories and other configurations.
- After building, you can start Autopsy using:
Installing Older Versions
You can find other versions of Autopsy at:
- Autopsy 4.4.0 and later: GitHub
- Autopsy 4.3.0 and earlier: Source Forge
Starting up
1. Setting Up Your Case in Autopsy
Firstly, initiate Autopsy and set up a new case. This is your foundational step, where you specify the details of the investigation.
Creating a new case involves entering basic information such as the case name, examiner details, and case number. Ensure these details are accurate; they frame your entire investigation.
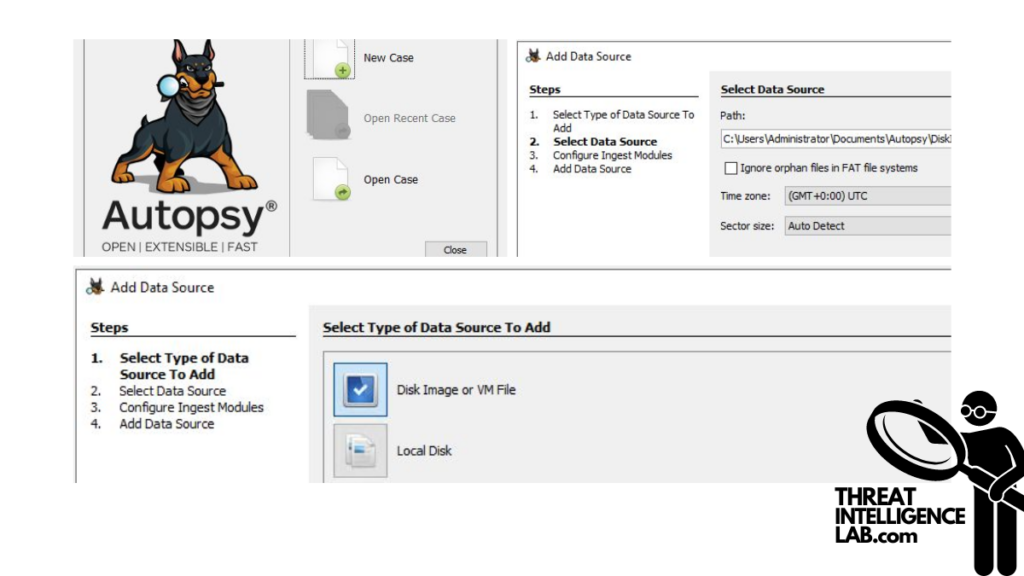
2. Adding and Understanding Your Data Source
Once your case is configured, the next step is to add a data source. You have several options:
- Disk Image or VM File: Perfect for an exact replica of a drive or virtual machine.
- Local Disk: Useful for direct analysis of physical drives like hard disks or USBs.
- Logical Files: Choose this for specific directories or files on a local system.
- Unallocated Space Image File: Ideal for examining remnants of deleted files.
Selecting the correct data source is critical as it determines the scope of data you can analyze.
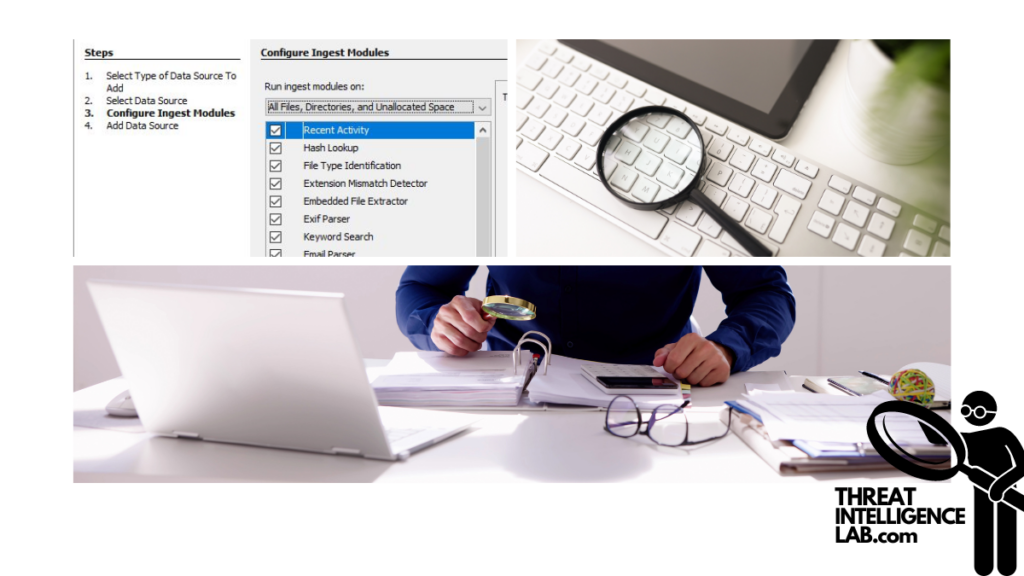
3. Configuring Ingest Modules
After adding your data source, configure the ingest modules. These modules are crucial as they dictate how Autopsy processes and extracts artifacts from your data.
They can pull specific types of data, from installed programs to web history and deleted files. Configuring these correctly enhances the thoroughness of your investigation.
Investigation Findings
Data Source Information
Here, you start by reviewing basic metadata which sets the stage for deeper analysis. It includes details like the source ID, file system type, and timestamps.
Encryption Detection
Identifying encrypted files is vital as they may contain concealed information. Autopsy flags these files, allowing you to prioritize them for decryption and further examination.
USB Device Analysis
The tool provides comprehensive details about any external devices connected to the system. This is particularly useful for tracing unauthorized access or data exfiltration.
E-mail and Communication
Exploring Outlook.pst files can reveal a trove of communication that may be pertinent to your case. E-mail artifacts include sent, received, and even deleted messages.
Checking Installed Programs
By examining the Software Registry hive, Autopsy lists all software installed on the system. This can be crucial for identifying tools used in malicious activities.
- Certiscope – Simplifying SSL/TLS Certificate Monitoring
- The Cyber Threat Intelligence Capability Maturity Model (CTI-CMM)
- Using YARA for Malware Analysis
- Incident Response Information Sharing with IRIS
- Introduction to Disk Analysis Using Autopsy
Internet Activity
Web searches and history are gold mines for behavioral analysis. It details all web activities, helping you understand the user’s intentions and actions online.
Remote Drive Access
Information about remote drives accessed by the system can indicate data movement or concealment strategies.
Web Cookies and Files
Cookies and file type analysis offer insights into a user’s online behavior and file management practices. It categorizes files and reveals cookie data, which can be pivotal in profiling user activities.
Recovery of Deleted Files
Perhaps one of the most powerful features is the ability to recover deleted files. This functionality allows you to restore critical evidence that was attempted to be erased.
Conclusion and Recommendations
I recommend taking a methodical approach when using this tool. Start by defining your case parameters clearly, choose the appropriate data source, and configure your ingest modules to target specific artifacts.
The best results come from a thorough understanding of the tool’s capabilities and a strategic plan for your investigation.